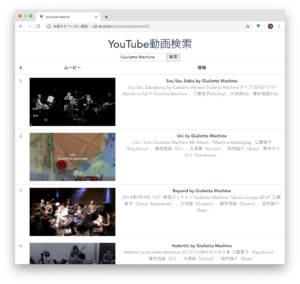
まずCDNでVue.jsのフレームワークをリンクすることにより、Youtube検索プログラムを作成しています。続いてnode.jsベースのVue CLI 3を使用して、シングルファイルコンポーネントとしてYoutube検索プログラムを作成しています。
Vue.jsの基本的な使用法については書籍を参照していただくことにして、ここではその概要を紹介します。
作成するYouTube動画検索アプリについて
APIキーを取得する
axiosライブラリについて
axiosライブラリを使用するために
<script src="https://unpkg.com/axios/dist/axios.min.js"></script>
axiosの基本的な使い方
axios
    .get("URL") // (1)
    .then(function(res){    // (2)
        // レスポンスを処理
    }
    .catch(function(err) {  // (3)
        // エラーが起こった場合の処理を記述
    });
■ CDNバージョンのYoutube検索プログラム
プログラム部分
var vm = new Vue({
    el: '#app',
    data: {
        results: null,  // (1)
        keyword: '',    // (2)
        params: {   // (3)
            q: '',  // 検索文字列
            part: 'snippet',
            type: 'video',
            maxResults: '10', // 最大検索数 // (4)
            // キーを設定
            key: 'APIキーを設定'   // (5)
        }
    },
    methods: {
        searchMovies: function() {   // (6)
            this.params.q = this.keyword;   // (7)
            var self = this;
            axios
                .get('https://www.googleapis.com/youtube/v3/search', {params: this.params}) // (8)
                .then(function(res) {
                    self.results = res.data.items;  // (9)
                })
                .catch(function(err) {
                    console.log(err);
                });
        }
    }
});
HTMLテンプレート
    <div id="app">
            <input v-model="keyword" placeholder="検索キーワードを入力" />  // (1)
            <button @click="searchMovies">検索</button>  // (2)
            <table class="table" v-show="results">
                <tr>
                    <th>#</th>
                    <th>ムービー</th>
                    <th>情報</th>
                </tr>
                <tr v-for="(movie, index) in results" v-bind:key="movie.id.videoId">  // (3)
                    <td>{{ index + 1 }}</td>
                    <td>
                        <a  // (4)
                            v-bind:href="'https://www.youtube.com/watch?v=' + movie.id.videoId"
                            ><img width=320 height=180
                                v-bind:src="movie.snippet.thumbnails.medium.url"
                        /></a>
                    </td>
                    <td>
                        <b>{{ movie.snippet.title }}</b> <br /> // (5)
                        <span class="desc">{{
                            movie.snippet.description
                        }}</span>
                    </td>
                </tr>
            </table>
        </div>
■ シングルファイルコンポーネント・バージョンのYoutube検索プログラム
ソースは次のGitHubリポジトリからダウンロードできます。
シングルファイルコンポーネントとは
シングルファイルコンポーネントは、Vue.jsのコンポーネントを構成する、HTMLテンプレート、JavaScript、スタイルシートを一つのファイルにまとめたものです。拡張子は「.vue」になります。
次に、シンプルなシングルファイルコンポーネントの例を示します。
リスト: hello.vue
<template>  //←(1)
  <div>
    <h1>{{ msg }}</h1>
  </div>
</template>

<script>
export default {    //←(2)
  name: "Hello",
  props: {
    msg: String
  }
};
</script>

<style scoped>  //←(3)
h1 {
  color: red;
}
</style>
(1)のように、HTMLテンプレートはtemplate要素として記述します。(2)のようにコンポーネントのインスタンスは、ES2015のexport default文でエクスポートします。(3)のようにスタイルシートのstyle要素も同じファイルに記述できます。
モジュールを追加する
YouTube動画検索アプリでは、外部ライブラリとしてaxiosとBootstrapを使用しています。これらをVue CLI 3で開発を行う場合には、npmを使用してnode.jsのモジュールとしてインストールできます。
コマンドラインでプロジェクトのディレクトリに移動し、次のように「npm install」コマンドを実行して2つのモジュールをインストールします。
npm install bootstrap【Enter】
npm install axios【Enter】
SearchYoutubeコンポーネントの作成
次に、SearchYoutubeコンポーネントとしてい使用するシングルファイルコンポーネントのファイル「SearchYoutube.vue」を示します。
リスト: SearchYoutube.vue
<template>  //←(1)
  <div class="hello">
    <h1>{{ msg }}</h1>  //←(2)
    <input v-model="keyword" placeholder="検索キーワードを入力">
    <button @click="searchMovies">検索</button>

    <table class="table" v-show="results">
      <tr>
        <th>#</th>
        <th>ムービー</th>
        <th>情報</th>
      </tr>
      <tr v-for="(movie, index) in results" v-bind:key="movie.id.videoId">
        <td>{{ index + 1 }}</td>
        <td>
          <a v-bind:href="'https://www.youtube.com/watch?v=' + movie.id.videoId">
            <img width="320" height="180" v-bind:src="movie.snippet.thumbnails.medium.url">
          </a>
        </td>
        <td>
          <b>{{ movie.snippet.title }}</b>
          <br>
          <span class="desc">
            {{
            movie.snippet.description
            }}
          </span>
        </td>
      </tr>
    </table>
  </div>
</template>

<script>
import axios from 'axios';  //←(3)
import 'bootstrap/dist/css/bootstrap.min.css';  //←(4)

export default {    //←(5)
  name: "SearchYoutube",
  data: function() {    //←(6)
    return {
      results: null,
      keyword: "Giulietta Machine",
      params: {
        q: "", // 検索文字列
        part: "snippet",
        type: "video",
        maxResults: "10", // 最大検索数
        key: "APIキーを設定"
      }
    };
  },
  props: {  //←(7)
    msg: String
  },
  methods: {
    searchMovies: function() {
      this.params.q = this.keyword;
      var self = this;
      axios //←(8)
        .get("https://www.googleapis.com/youtube/v3/search", {
          params: this.params
        })
        .then(function(res) {
          self.results = res.data.items;
        })
    }
  }
};
</script>

<style scoped>  //←(8)
.desc {
  color: gray;
}
</style>
HTMLテンプレートは、(1)のtemplate要素として記述しています。内容は(2)でmsgプロパティを表示している以外は以前のものと同じです。
script要素では、(3)(4)でaxiosとbootstrapのCSS部分を読み込んでいます。(5)の「export default」でコンポーネントのインスタンスを定義しています。コンポーネント化したことで、(6)のdataは関数の戻り値としている点に注意してください。
また、新たに(7)のpropsで、タイトルとして表示するテキストであるmsgプロパティを登録しています。
(8)のaxiosを使用して検索結果をresultsプロパティに格納しています。なお、ESLintの初期設定ではconsole.log()メソッドがあるとエラーが表示されるため、ここではcatch()メソッドによるエラー処理を省略しています。
(9)でスタイルシートを記述しています。
シングルファイルコンポーネント化するといっても、以外と変更点は少ないと思います。しかも、Visual Studio CodeのようなエディタではHTMLテンプレート部分が色分けされてわかりやすく表示されます。
App.vue
次に、メインのシングルファイルコンポーネントであるApp.vueを変更し、SearchYoutubeコンポーネントを読み込むようにします。
リスト: App.vue
<template>
  <div id="app">
    <SearchYoutube msg="YouTube動画検索"/>  //←(1)
  </div>
</template>

<script>
import SearchYoutube from './components/SearchYoutube.vue'  //←(2)
export default {
  name: 'app',
  components: {
    SearchYoutube   //←(3)
  }
}
</script>
template要素では(1)でSearchYoutubeコンポーネントを使用して、msg属性にタイトルとして”YouTube動画検索”を渡しています。script要素では、(2)のimport文でSearchYoutube.vueを読み込んで、(3)でコンポーネントとして登録しています。
その他のサンプル
本書のその他のサンプル
- おみくじアプリ
- カウント
- お絵かきアプリ
- ローカルストレージに保存可能なtodoリスト
- スタイドショー
- 書籍リストのJSONデータを読み込む
- アニメーション
- etc.
大津真

